Introduction
Welcome to the Employment Hero API Partner documentation. This document aims to help software providers build robust integrations with our HR platform for our shared customers.
Note
Looking to refer clients to Employment Hero and earn a commission instead? Check out our Referral Program
If you're looking to use Employment Hero Payroll APIs, please refer to the Payroll API documentation.
How to request an HR organisation for testing
To get started with API development, you'll need access to a test HR organisation. This provides you with a safe environment to develop and test your integration without affecting real data.
To set up a test/sandbox organisation:
-
Sign up for a free trial here
-
Fill in the form and follow the instructions sent to your organisation to set up your free trial organisation
-
Once your free trial organisation is set up, you will have access to the Developer Portal for 2 weeks for the duration of your free trial. To extend this or apply for a permanent sandbox, please email your partner manager, or partner@employmenthero.com. Provide the following details:
- Company name: the name of your company
- Software name: the name of your software that will integrate with Employment Hero, if applicable
- Free trial organisation ID: this can be found in the URL of most pages in your organisation, like so:
https://secure.employmenthero.com/app/v2/organisations/<organisation_id>. - Expected timeline: an approximate timeline of your project, if applicable
- App details: a short summary of the purpose of your integration, for example "We are looking to pull leave data from Employment Hero for use in our platform".
Our team will review your request and upgrade your free trial organisation to a permanent sandbox organisation.
Creating an Employment Hero API application
An application must be created from within the platform to retrieve your API credentials and authorise your requests. Follow these steps to get started:
-
Log in to your trial/sandbox organisation
-
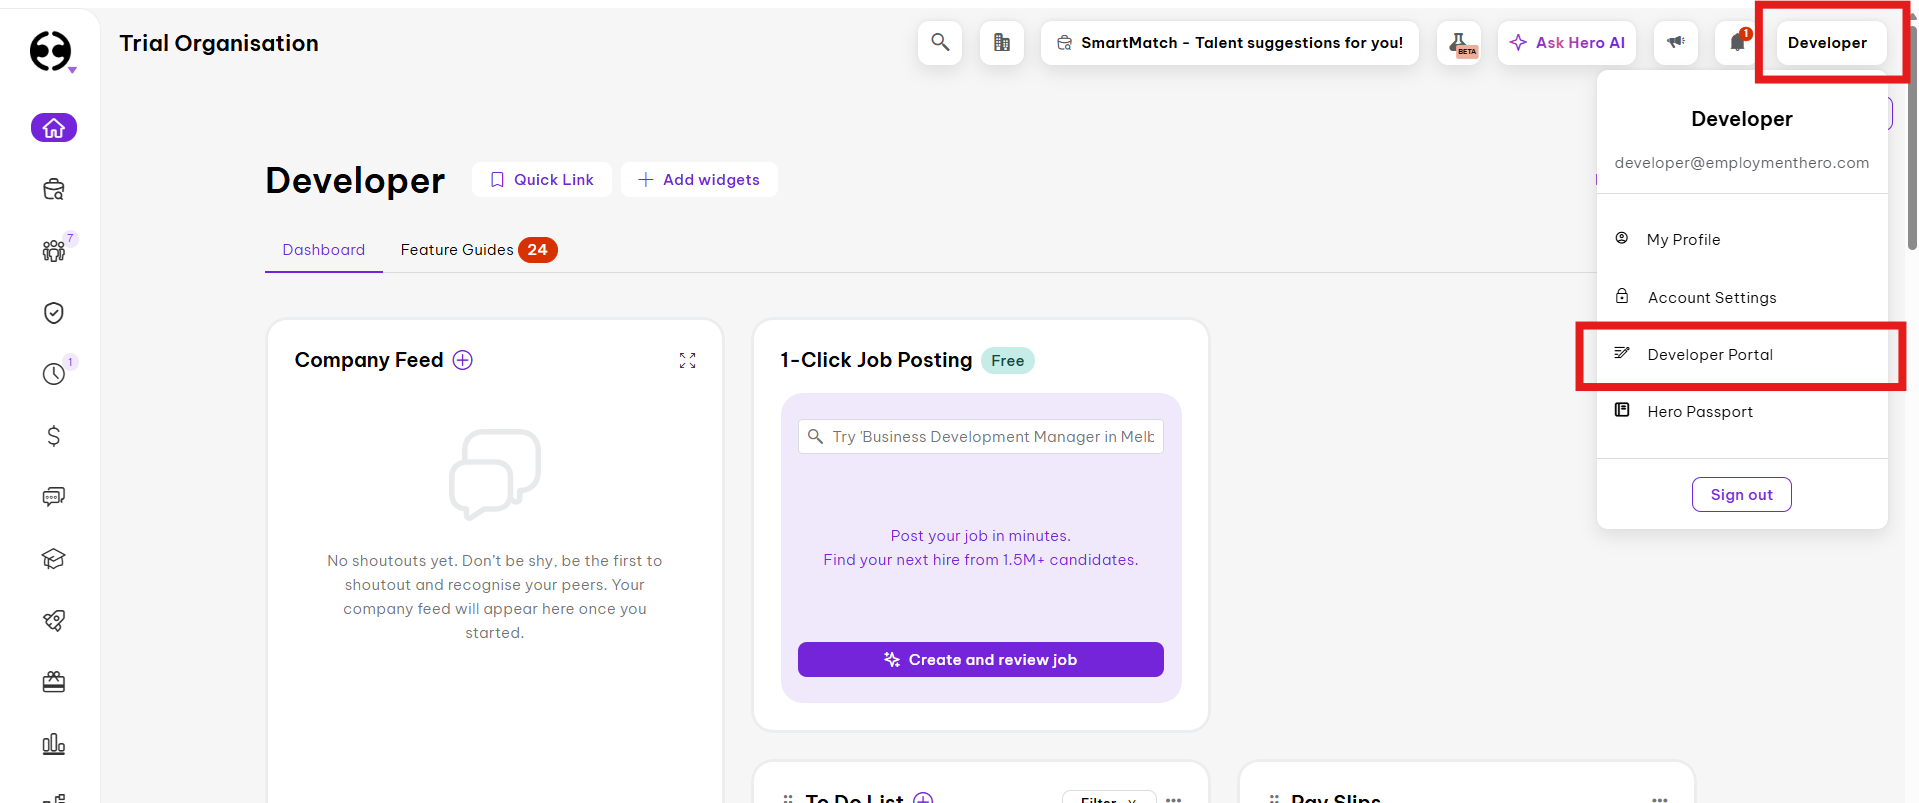
Click on your profile on the top right corner, and click on Developer Portal
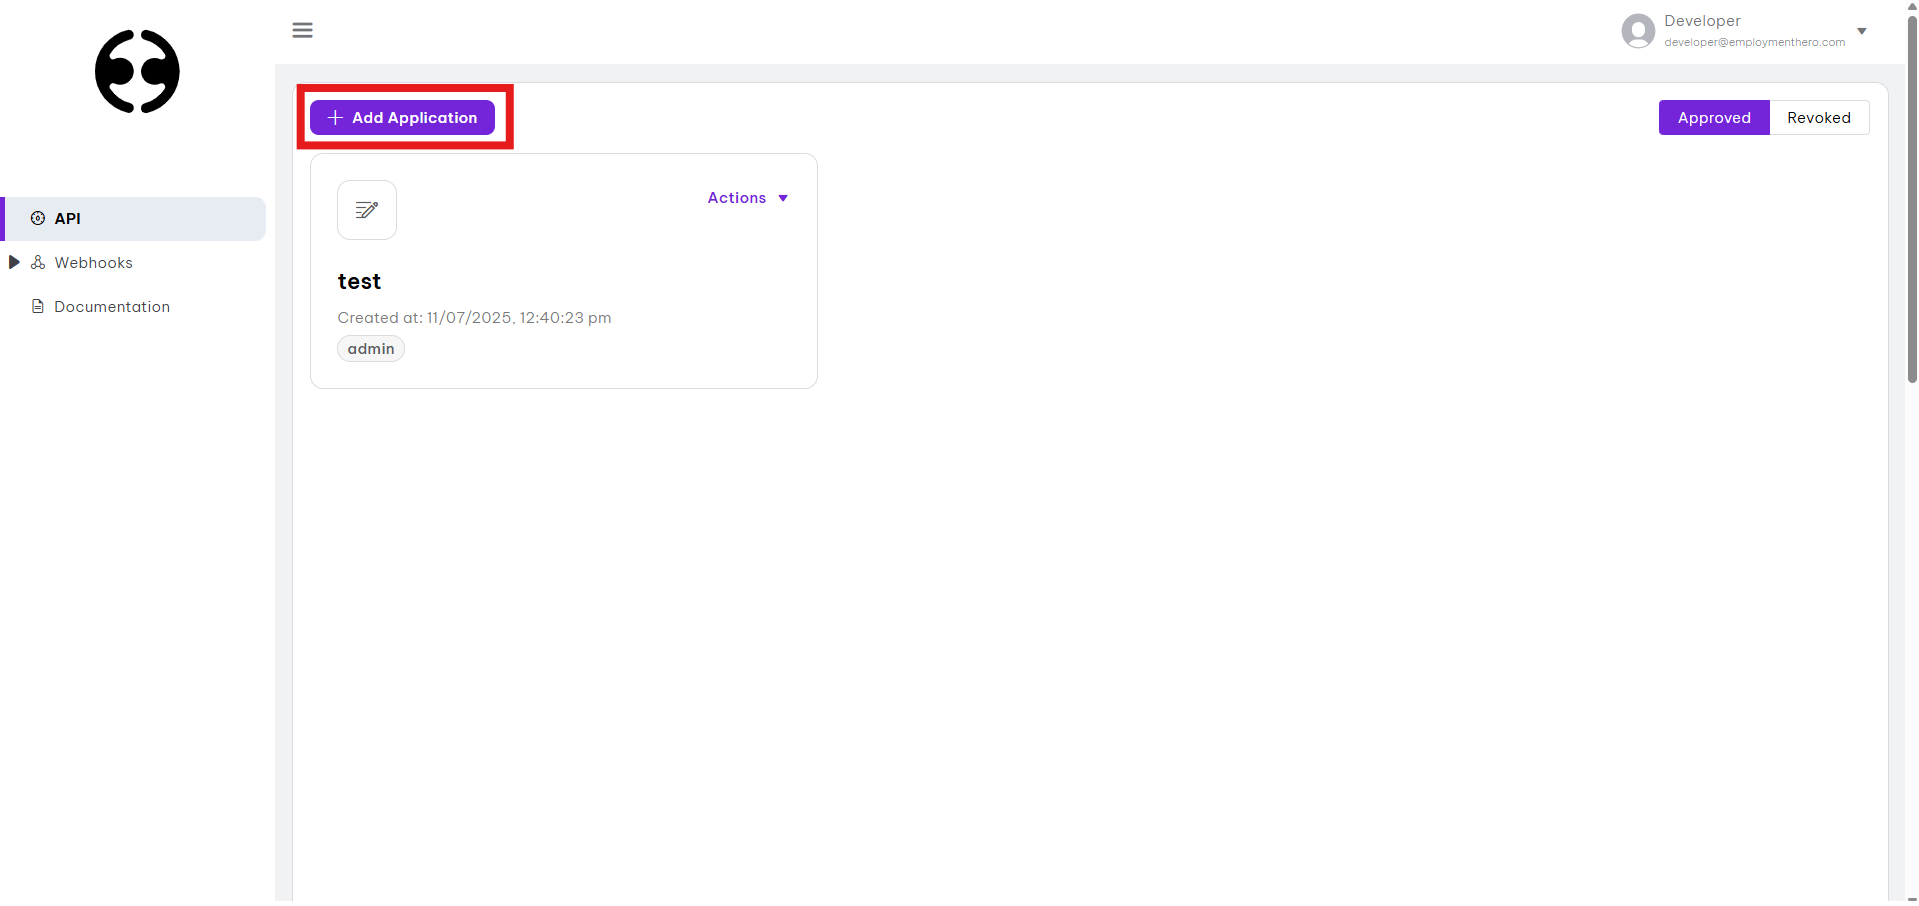
- Click the
+ Add Applicationbutton
- Fill in your application details
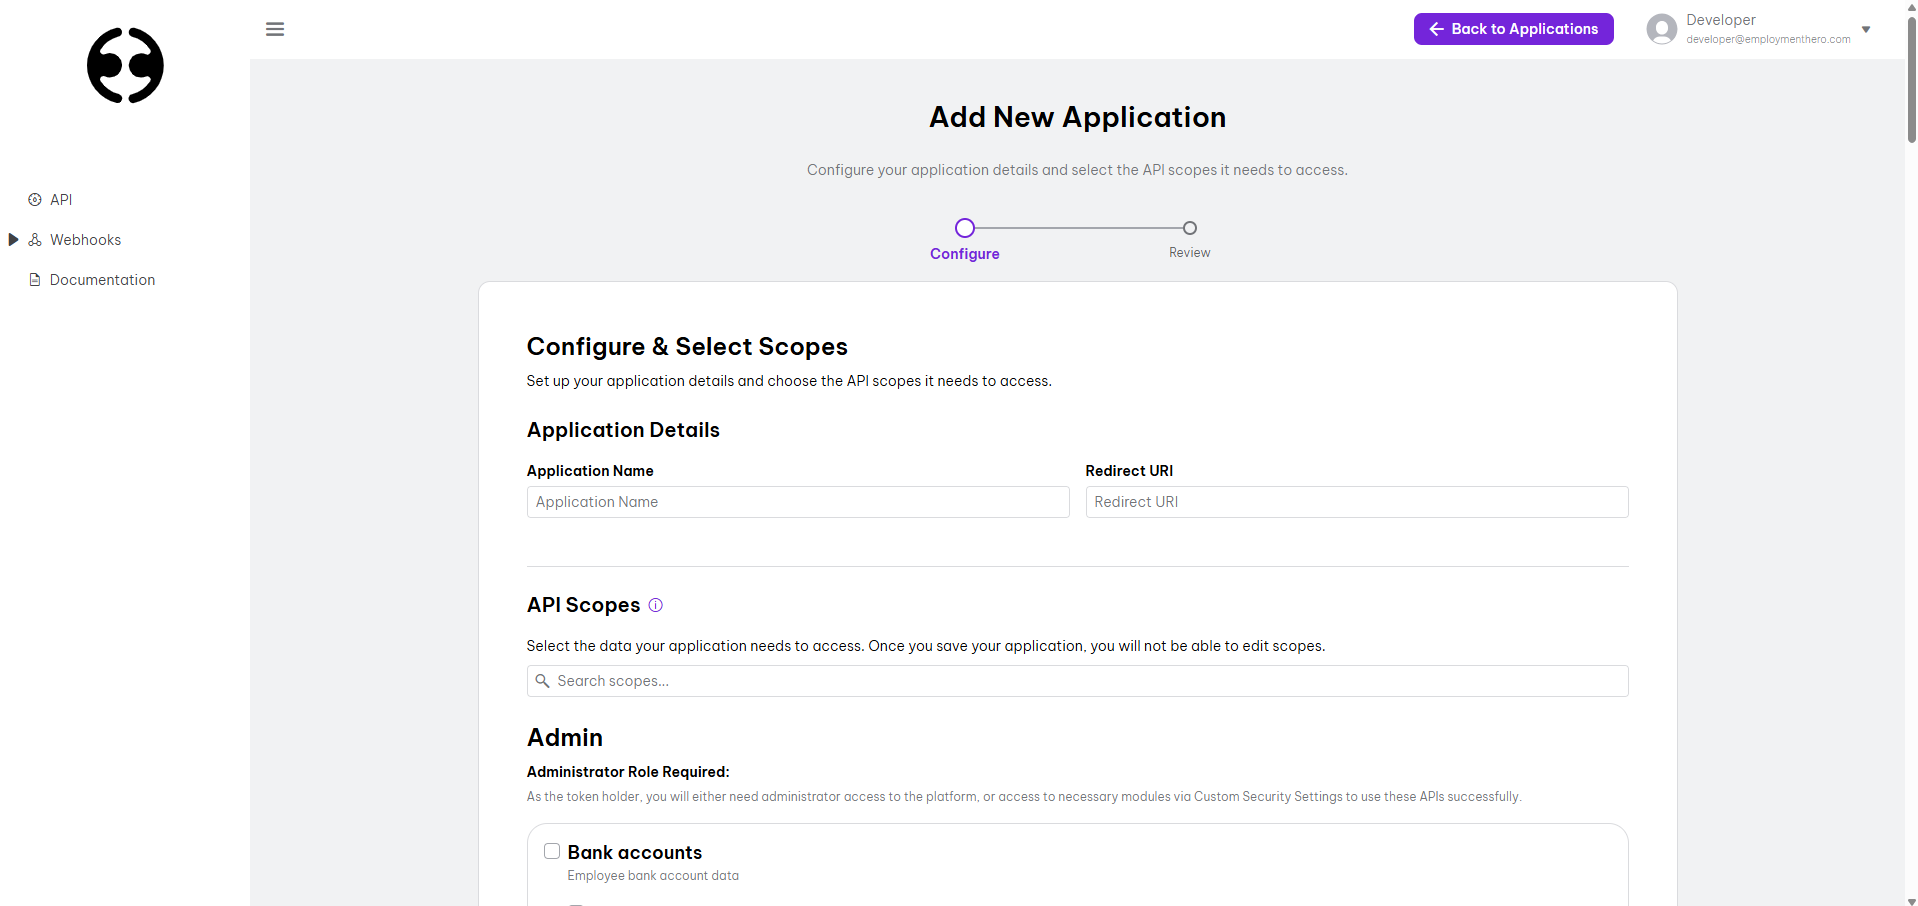
| Field | Description |
|---|---|
| Name | A meaningful name for your OAuth 2.0 application (e.g. EH API Test Client) |
| Scope | A list of scopes which the application can access. The scope list will be provided by Employment Hero. NOTE: For security and data sensitivity concerns, scopes are a one-time selection on application creation. |
| Redirect URI(s) | One or more URIs hosted by your company which a user will be redirected to following a successful OAuth handshake. Use a comma-separated list to add multiple redirect URIs. Please note that for security purposes, we request that you provide HTTPS URIs. |
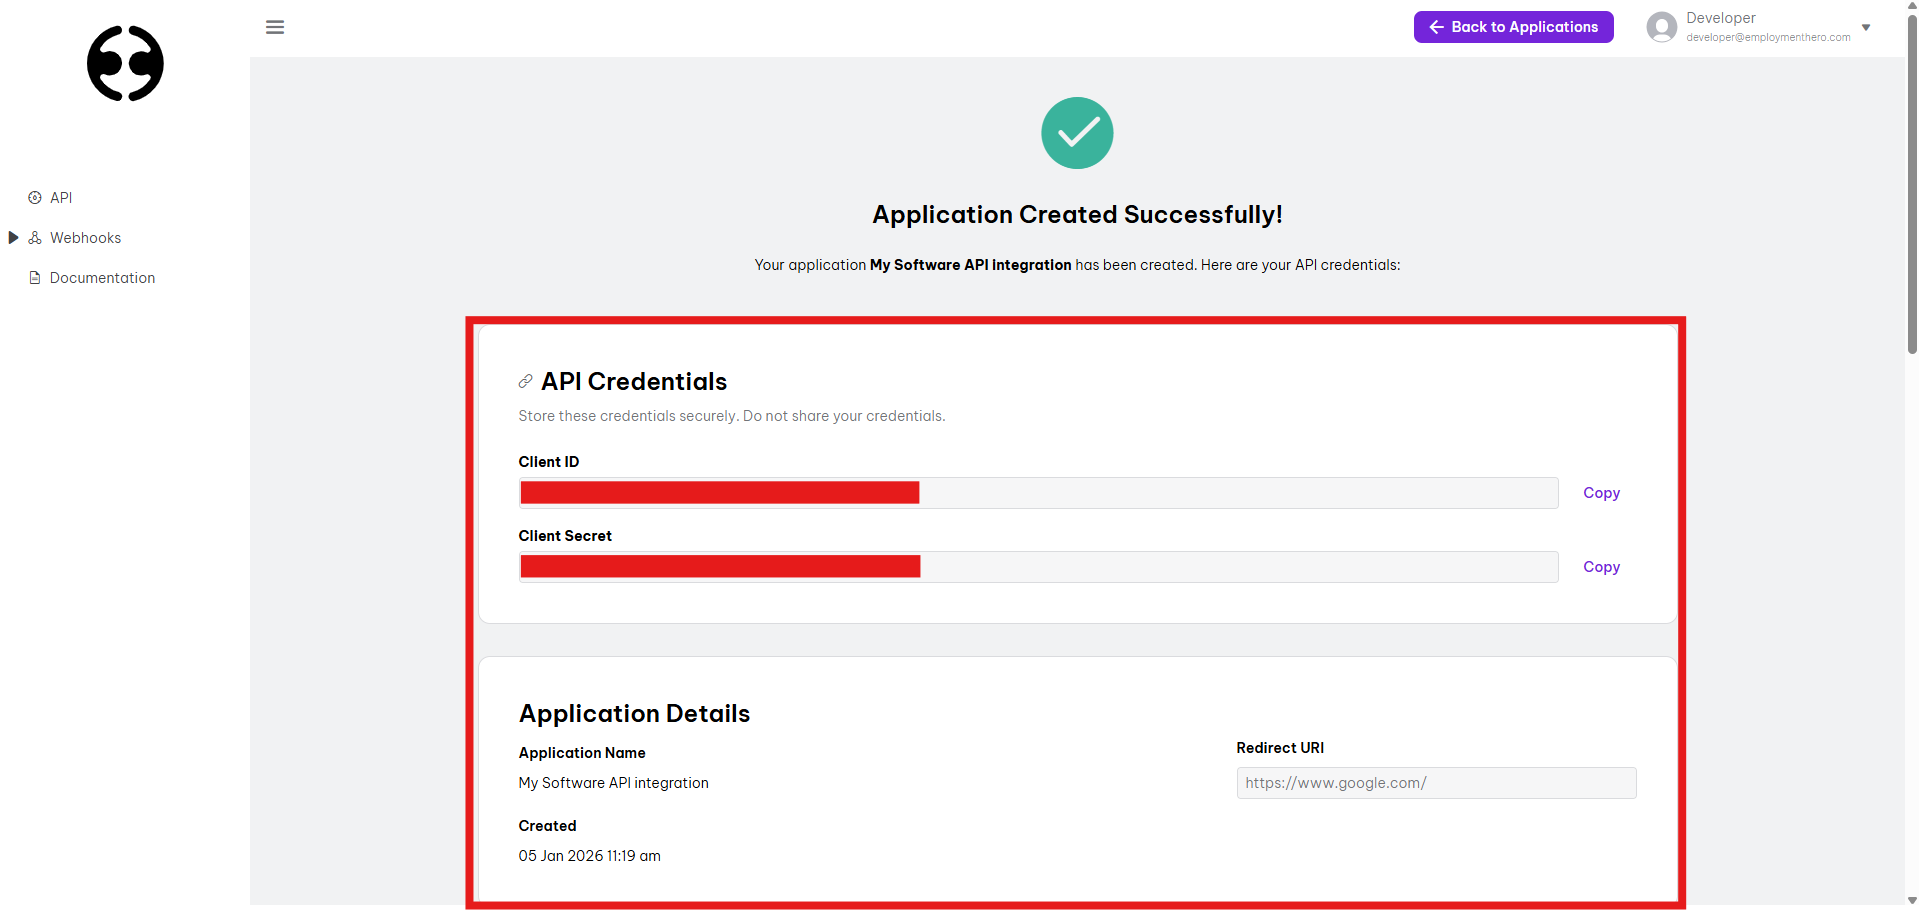
- Once you're happy with the scoping, review and save your application. Your Client ID and Secret will be provided.
Implementing OAuth for multi-tenancy
Our APIs use the OAuth 2.0 framework. This allows you to use a single set of Credentials (Client ID and Client Secret) to authenticate and manage unique integrations across your entire customer base.
Instead of requiring a unique API key for every organization, you will use a standardized authorization flow to gain access to individual customer accounts.
PKCE Rollout
As part of the PKCE mandate rollout (effective 2026-09-14), the
authorisation flow below requires a code_challenge and
code_challenge_method on the redirect step, and a code_verifier on the
token exchange step. As part of the same rollout, client_id and
client_secret must also be sent in the request body
(application/x-www-form-urlencoded) rather than as query parameters on the
token exchange and refresh requests. The examples below have been updated to
reflect these changes — requests that don't follow this format will be
rejected once the mandate takes effect.
How it Works
-
Authorization Request: You redirect the customer to the Employment Hero OAuth portal. This can easily be set up as a button click.
-
Customer Consent: The customer logs in to their Employment Hero account and authorizes your application to access their specific HR data.
-
Token Exchange: Upon approval, we provide an Authorization Code which you exchange for an Access Token and a Refresh Token.
-
Scoped Access: The Access Token is unique to that specific customer. When making API calls, this token tells our system exactly which organization's data you are permitted to view or modify.
Key Benefits for Partners
-
Centralized Management: Manage all customer connections through a single partner dashboard.
-
Enhanced Security: No need to store or handle sensitive customer passwords or static API keys.
-
Scalability: Onboard new customers instantly via a self-service "Connect" button within your own application.
Implementation Steps
-
Implement the One click authorisation. This will redirect the user to login to their Employment Hero account to give your app access to selected scopes within their organisation. As part of the PKCE mandate, you must first generate a
code_verifierandcode_challengepair, store thecode_verifieragainst the user's session, and include thecode_challengein the redirect. Below is an example on how this can be done in Node.js (Express.js framework):<client_id>- the client ID retrieved from your developer portal app<client_secret>- the client secret retrieved from your developer portal app<redirect_uri>- the redirect uri defined during your developer portal app creation
For more details about the authorisation endpoint, refer to the full developer docs section here.
const app = express();
const crypto = require('crypto');

const CLIENT_ID = '<client_id>';
const CLIENT_SECRET = '<client_secret>';
const REDIRECT_URI = '<redirect_uri>';
const AUTH_URL = 'https://oauth.employmenthero.com/oauth2/authorize';
const TOKEN_URL = 'https://oauth.employmenthero.com/oauth2/token';

// Generates a PKCE code_verifier/code_challenge pair (RFC 7636, S256 method)
function generatePkcePair() {
  const codeVerifier = crypto.randomBytes(32).toString('base64url');
  const codeChallenge = crypto
    .createHash('sha256')
    .update(codeVerifier)
    .digest('base64url');
  return { codeVerifier, codeChallenge };
}

// Step 1: Redirect user to the Authorization URL
app.get('/connect', (req, res) => {
  const { codeVerifier, codeChallenge } = generatePkcePair();
  // Store the code_verifier against the user's session so it can be
  // retrieved in the callback below and sent during the token exchange
  req.session.codeVerifier = codeVerifier;

  const params = new URLSearchParams({
    client_id: CLIENT_ID,
    redirect_uri: REDIRECT_URI,
    response_type: 'code',
    code_challenge: codeChallenge,
    code_challenge_method: 'S256'
  });
  res.redirect(`${AUTH_URL}?${params.toString()}`);
});- Handle callback and exchange for access and refresh tokens. This will allow your app to retrieve unique tokens using the authorisation code granted by the user’s login. The
code_verifierstored in the previous step must be included in this request, andclient_id/client_secretmust be sent in the request body rather than as query parameters.
// Step 2: Handle the callback from Employment Hero
app.get('/callback', async (req, res) => {
  const authCode = req.query.code;
  const codeVerifier = req.session.codeVerifier;
  if (!authCode) {
    return res.status(400).send('Authorization failed: No code provided.');
  }
  try {
    // Step 3: Exchange Authorization Code for Access Token
    // grant_type and redirect_uri are sent as query parameters
    const queryParams = new URLSearchParams({
      grant_type: 'authorization_code',
      redirect_uri: REDIRECT_URI
    });
    // client_id, client_secret, code and code_verifier must be sent in the
    // request body as application/x-www-form-urlencoded
    const bodyParams = new URLSearchParams({
      client_id: CLIENT_ID,
      client_secret: CLIENT_SECRET,
      code: authCode,
      code_verifier: codeVerifier
    });
    const response = await fetch(`${TOKEN_URL}?${queryParams.toString()}`, {
      method: 'POST',
      body: bodyParams
    });
    if (!response.ok) {
      throw new Error('Token exchange failed');
    }
    const data = await response.json();
    // data contains: access_token, refresh_token, expires_in
    console.log('Success! Access Token:', data.access_token);
    // TODO: Store tokens in your database associated with THIS specific customer organization
    res.json(data);
  } catch (error) {
    console.error('Token exchange failed:', error);
    res.status(500).send('Error completing integration.');
  } finally {
    // code_verifier is single-use — remove it once the exchange has been attempted
    delete req.session.codeVerifier;
  }
});- Once you have the tokens, you can use the access token to validate API requests to the user’s organisation. As the access token expires 15 minutes after creation, you can automatically maintain a valid connection by using the refresh token to fetch new access tokens. Example script:
/**
 * Refreshes an expired access token using the stored refresh_token.
 * @param {string} storedRefreshToken - The refresh token previously saved for this customer.
 */
async function refreshTokenFn(storedRefreshToken) {
  try {
    // grant_type and refresh_token are sent as query parameters
    const queryParams = new URLSearchParams({
      grant_type: 'refresh_token',
      refresh_token: storedRefreshToken
    });
    // client_id and client_secret must be sent in the request body as
    // application/x-www-form-urlencoded
    const bodyParams = new URLSearchParams({
      client_id: CLIENT_ID,
      client_secret: CLIENT_SECRET
    });
    const response = await fetch(`${TOKEN_URL}?${queryParams.toString()}`, {
      method: 'POST',
      body: bodyParams
    });
    if (!response.ok) {
      throw new Error('Refresh token failed');
    }
    const data = await response.json();
    // data contains: access_token, refresh_token, expires_in
    console.log('New Access Token:', data.access_token);
    // IMPORTANT: Overwrite the old refresh_token in your database with the
    // new one provided in this response to prevent future auth failures.
    return data;
  } catch (error) {
    console.error('Network error during refresh:', error);
  }
}

app.post('/refresh', async (req, res) => {
  // just as an example, get refresh token from user data in the database (stored in above step)
  const refreshToken = req.body.refresh_token;
  if (!refreshToken) {
    return res.status(400).send('Refresh token is required');
  }
  const data = await refreshTokenFn(refreshToken);
  res.json(data);
});